

说明
- 系统:centos7,虚拟机内存 4G,建议虚拟机配置高点
- 部署模式:双master模式
分别为:
192.168.18.151 ipa1.tobehacker.com
192.168.18.152 ipa2.tobehacker.com
配置yum源
cd /etc/yum.repos.d/
wget http://mirrors.aliyun.com/repo/epel-7.repo
wget http://mirrors.aliyun.com/repo/Centos-7.repo
配置时间同步
yum -y install ntpdate

ntpdate ntp1.aliyun.com

echo "*/10 * * * * /usr/sbin/ntpdate time1.aliyun.com" >> /var/spool/cron/root

timedatectl set-timezone Asia/Shanghai

hwclock --systohc

相关主机 关闭selinux和防火墙
关闭selinux
sed -i 's/SELINUX=enforcing/SELINUX=disabled/g' /etc/selinux/config
关闭防火墙
注意: 测试可以这样,正式生产环境推荐下面开放端口
systemctl stop firewalld.service
systemctl disable firewalld.service
不关闭防火墙,开放端口
firewall-cmd --add-port=80/tcp --permanent
firewall-cmd --add-port=88/tcp --permanent
firewall-cmd --add-port=88/udp --permanent
firewall-cmd --add-port=389/tcp --permanent
firewall-cmd --add-port=389/udp --permanent
firewall-cmd --add-port=636/tcp --permanent
firewall-cmd --add-port=464/tcp --permanent
firewall-cmd --add-port=464/udp --permanent
firewall-cmd --add-port=53/tcp --permanent
firewall-cmd --add-port=53/udp --permanent
firewall-cmd --add-port=123/udp --permanent
firewall-cmd --add-port=7389/tcp --permanent
firewall-cmd --add-port=9443/tcp --permanent
firewall-cmd --add-port=9444/tcp --permanent
firewall-cmd --reload
ipa1、ipa2 配置hostname和/etc/hosts
hostname配置
# ipa1主机执行
hostnamectl set-hostname ipa1.tobehacker.com
# ipa2主机执行
hostnamectl set-hostname ipa2.tobehacker.com
/etc/hosts配置
两台主机都执行一下
echo "192.168.18.151 ipa1.tobehacker.com ipa1"  >> /etc/hosts

echo "192.168.18.152 ipa2.tobehacker.com ipa2"  >> /etc/hosts
ipa1、ipa2 配置 /etc/sysconfig/network-scripts/ifcfg-ens33
ipa1的配置
# 执行  vim /etc/sysconfig/network-scripts/ifcfg-ens33
DEVICE=ens33
ONBOOT=yes
IPADDR=192.168.18.151
NETMASK=255.255.255.0
GATEWAY=192.168.18.2
DNS1=192.168.18.151
DNS2=114.114.114.114
重启
systemctl restart network
ipa2的配置
# 执行  vim /etc/sysconfig/network-scripts/ifcfg-ens33
DEVICE=ens33
ONBOOT=yes
IPADDR=192.168.18.152
NETMASK=255.255.255.0
GATEWAY=192.168.18.2
# 192.168.18.151 ipa1 作为DNS1服务器
DNS1=192.168.18.151
DNS2=114.114.114.114
重启
systemctl restart network
ipa1 、ipa2安装ipa-server服务
yum install -y ipa-server bind bind-dyndb-ldap ipa-server-dns
执行下面命令,升级nss,否则可能会有下面错误, 点我看RedHat solutions
yum update nss

注意事项: 软件包安装完成,必须把DNS2=114.114.114.114 删掉
上面安装完所需软件包:/etc/sysconfig/network-scripts/ifcfg-ens33文件里把 DNS2一行 删掉、两台主机改完后执行
systemctl restart network
ipa1 安装 ipa-server-install
注意:虚拟机最好先弄个快照,修改下面相关参数 TOBEHACKER.COM、tobehacker.com、
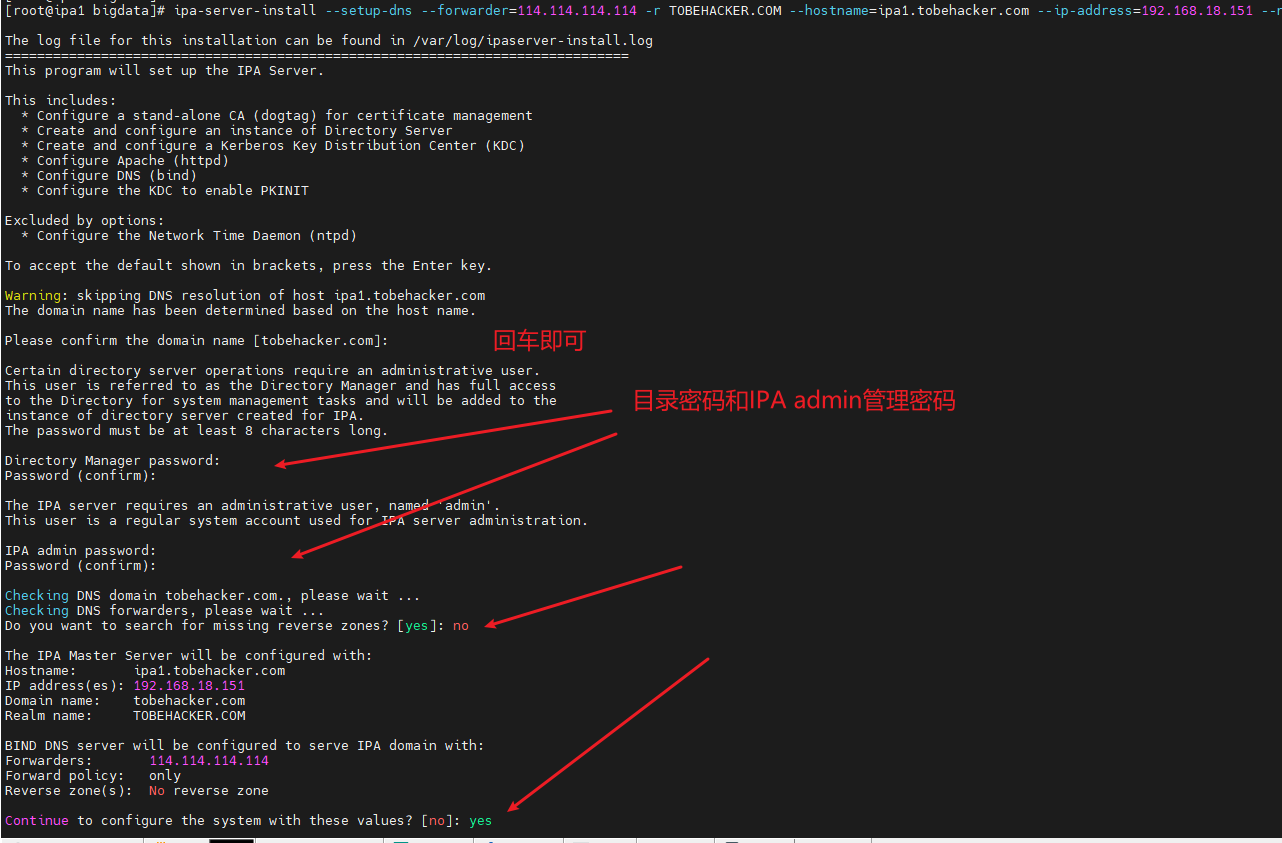
ipa-server-install --setup-dns --forwarder=114.114.114.114 -r TOBEHACKER.COM --hostname=ipa1.tobehacker.com --ip-address=192.168.18.151 --no-ntp --no-reverse
出现如下界面
** 如果出现错误执行以下命令可以卸载**
ipa-server-install --uninstall
下面安装ipa1成功的日志,可参考
ipa1-ipaserver-install.log
The log file for this installation can be found in /var/log/ipaserver-install.log
==============================================================================
This program will set up the IPA Server.

This includes:
* Configure a stand-alone CA (dogtag) for certificate management
* Create and configure an instance of Directory Server
* Create and configure a Kerberos Key Distribution Center (KDC)
* Configure Apache (httpd)
* Configure DNS (bind)
* Configure the KDC to enable PKINIT

Excluded by options:
* Configure the Network Time Daemon (ntpd)

To accept the default shown in brackets, press the Enter key.

Warning: skipping DNS resolution of host ipa1.tobehacker.com
The domain name has been determined based on the host name.

Please confirm the domain name [tobehacker.com]:

Certain directory server operations require an administrative user.
This user is referred to as the Directory Manager and has full access
to the Directory for system management tasks and will be added to the
instance of directory server created for IPA.
The password must be at least 8 characters long.

Directory Manager password:
Password (confirm):

The IPA server requires an administrative user, named 'admin'.
This user is a regular system account used for IPA server administration.

IPA admin password:
Password (confirm):

Checking DNS domain tobehacker.com., please wait ...
Checking DNS forwarders, please wait ...
DNS server 114.114.114.114: answer to query '. SOA' is missing DNSSEC signatures (no RRSIG data)
Please fix forwarder configuration to enable DNSSEC support.
(For BIND 9 add directive "dnssec-enable yes;" to "options {}")
WARNING: DNSSEC validation will be disabled

The IPA Master Server will be configured with:
Hostname:       ipa1.tobehacker.com
IP address(es): 192.168.18.151
Domain name:    tobehacker.com
Realm name:     TOBEHACKER.COM

BIND DNS server will be configured to serve IPA domain with:
Forwarders:       114.114.114.114
Forward policy:   only
Reverse zone(s):  No reverse zone

Continue to configure the system with these values? [no]: yes

The following operations may take some minutes to complete.
Please wait until the prompt is returned.

Configuring directory server (dirsrv). Estimated time: 30 seconds
[1/45]: creating directory server instance
[2/45]: enabling ldapi
[3/45]: configure autobind for root
[4/45]: stopping directory server
[5/45]: updating configuration in dse.ldif
[6/45]: starting directory server
[7/45]: adding default schema
[8/45]: enabling memberof plugin
[9/45]: enabling winsync plugin
[10/45]: configure password logging
[11/45]: configuring replication version plugin
[12/45]: enabling IPA enrollment plugin
[13/45]: configuring uniqueness plugin
[14/45]: configuring uuid plugin
[15/45]: configuring modrdn plugin
[16/45]: configuring DNS plugin
[17/45]: enabling entryUSN plugin
[18/45]: configuring lockout plugin
[19/45]: configuring topology plugin
[20/45]: creating indices
[21/45]: enabling referential integrity plugin
[22/45]: configuring certmap.conf
[23/45]: configure new location for managed entries
[24/45]: configure dirsrv ccache
[25/45]: enabling SASL mapping fallback
[26/45]: restarting directory server
[27/45]: adding sasl mappings to the directory
[28/45]: adding default layout
[29/45]: adding delegation layout
[30/45]: creating container for managed entries
[31/45]: configuring user private groups
[32/45]: configuring netgroups from hostgroups
[33/45]: creating default Sudo bind user
[34/45]: creating default Auto Member layout
[35/45]: adding range check plugin
[36/45]: creating default HBAC rule allow_all
[37/45]: adding entries for topology management
[38/45]: initializing group membership
[39/45]: adding master entry
[40/45]: initializing domain level
[41/45]: configuring Posix uid/gid generation
[42/45]: adding replication acis
[43/45]: activating sidgen plugin
[44/45]: activating extdom plugin
[45/45]: configuring directory to start on boot
Done configuring directory server (dirsrv).
Configuring Kerberos KDC (krb5kdc)
[1/10]: adding kerberos container to the directory
[2/10]: configuring KDC
[3/10]: initialize kerberos container
[4/10]: adding default ACIs
[5/10]: creating a keytab for the directory
[6/10]: creating a keytab for the machine
[7/10]: adding the password extension to the directory
[8/10]: creating anonymous principal
[9/10]: starting the KDC
[10/10]: configuring KDC to start on boot
Done configuring Kerberos KDC (krb5kdc).
Configuring kadmin
[1/2]: starting kadmin
[2/2]: configuring kadmin to start on boot
Done configuring kadmin.
Configuring ipa-custodia
[1/5]: Making sure custodia container exists
[2/5]: Generating ipa-custodia config file
[3/5]: Generating ipa-custodia keys
[4/5]: starting ipa-custodia
[5/5]: configuring ipa-custodia to start on boot
Done configuring ipa-custodia.
Configuring certificate server (pki-tomcatd). Estimated time: 3 minutes
[1/30]: configuring certificate server instance
[2/30]: secure AJP connector
[3/30]: reindex attributes
[4/30]: exporting Dogtag certificate store pin
[5/30]: stopping certificate server instance to update CS.cfg
[6/30]: backing up CS.cfg
[7/30]: disabling nonces
[8/30]: set up CRL publishing
[9/30]: enable PKIX certificate path discovery and validation
[10/30]: starting certificate server instance
[11/30]: configure certmonger for renewals
[12/30]: requesting RA certificate from CA
[13/30]: setting audit signing renewal to 2 years
[14/30]: restarting certificate server
[15/30]: publishing the CA certificate
[16/30]: adding RA agent as a trusted user
[17/30]: authorizing RA to modify profiles
[18/30]: authorizing RA to manage lightweight CAs
[19/30]: Ensure lightweight CAs container exists
[20/30]: configure certificate renewals
[21/30]: configure Server-Cert certificate renewal
[22/30]: Configure HTTP to proxy connections
[23/30]: restarting certificate server
[24/30]: updating IPA configuration
[25/30]: enabling CA instance
[26/30]: migrating certificate profiles to LDAP
[27/30]: importing IPA certificate profiles
[28/30]: adding default CA ACL
[29/30]: adding 'ipa' CA entry
[30/30]: configuring certmonger renewal for lightweight CAs
Done configuring certificate server (pki-tomcatd).
Configuring directory server (dirsrv)
[1/3]: configuring TLS for DS instance
[2/3]: adding CA certificate entry
[3/3]: restarting directory server
Done configuring directory server (dirsrv).
Configuring ipa-otpd
[1/2]: starting ipa-otpd
[2/2]: configuring ipa-otpd to start on boot
Done configuring ipa-otpd.
Configuring the web interface (httpd)
[1/22]: stopping httpd
[2/22]: setting mod_nss port to 443
[3/22]: setting mod_nss cipher suite
[4/22]: setting mod_nss protocol list to TLSv1.2
[5/22]: setting mod_nss password file
[6/22]: enabling mod_nss renegotiate
[7/22]: disabling mod_nss OCSP
[8/22]: adding URL rewriting rules
[9/22]: configuring httpd
[10/22]: setting up httpd keytab
[11/22]: configuring Gssproxy
[12/22]: setting up ssl
[13/22]: configure certmonger for renewals
[14/22]: importing CA certificates from LDAP
[15/22]: publish CA cert
[16/22]: clean up any existing httpd ccaches
[17/22]: configuring SELinux for httpd
[18/22]: create KDC proxy config
[19/22]: enable KDC proxy
[20/22]: starting httpd
[21/22]: configuring httpd to start on boot
[22/22]: enabling oddjobd
Done configuring the web interface (httpd).
Configuring Kerberos KDC (krb5kdc)
[1/1]: installing X509 Certificate for PKINIT
Done configuring Kerberos KDC (krb5kdc).
Applying LDAP updates
Upgrading IPA:. Estimated time: 1 minute 30 seconds
[1/10]: stopping directory server
[2/10]: saving configuration
[3/10]: disabling listeners
[4/10]: enabling DS global lock
[5/10]: disabling Schema Compat
[6/10]: starting directory server
[7/10]: upgrading server
[8/10]: stopping directory server
[9/10]: restoring configuration
[10/10]: starting directory server
Done.
Restarting the KDC
Configuring DNS (named)
[1/11]: generating rndc key file
[2/11]: adding DNS container
[3/11]: setting up our zone
[4/11]: setting up our own record
[5/11]: setting up records for other masters
[6/11]: adding NS record to the zones
[7/11]: setting up kerberos principal
[8/11]: setting up named.conf
[9/11]: setting up server configuration
[10/11]: configuring named to start on boot
[11/11]: changing resolv.conf to point to ourselves
Done configuring DNS (named).
Restarting the web server to pick up resolv.conf changes
Configuring DNS key synchronization service (ipa-dnskeysyncd)
[1/7]: checking status
[2/7]: setting up bind-dyndb-ldap working directory
[3/7]: setting up kerberos principal
[4/7]: setting up SoftHSM
[5/7]: adding DNSSEC containers
[6/7]: creating replica keys
[7/7]: configuring ipa-dnskeysyncd to start on boot
Done configuring DNS key synchronization service (ipa-dnskeysyncd).
Restarting ipa-dnskeysyncd
Restarting named
Updating DNS system records
Configuring client side components
Using existing certificate '/etc/ipa/ca.crt'.
Client hostname: ipa1.tobehacker.com
Realm: TOBEHACKER.COM
DNS Domain: tobehacker.com
IPA Server: ipa1.tobehacker.com
BaseDN: dc=tobehacker,dc=com

Skipping synchronizing time with NTP server.
New SSSD config will be created
Configured sudoers in /etc/nsswitch.conf
Configured /etc/sssd/sssd.conf
trying https://ipa1.tobehacker.com/ipa/json
[try 1]: Forwarding 'schema' to json server 'https://ipa1.tobehacker.com/ipa/json'
trying https://ipa1.tobehacker.com/ipa/session/json
[try 1]: Forwarding 'ping' to json server 'https://ipa1.tobehacker.com/ipa/session/json'
[try 1]: Forwarding 'ca_is_enabled' to json server 'https://ipa1.tobehacker.com/ipa/session/json'
Systemwide CA database updated.
Adding SSH public key from /etc/ssh/ssh_host_rsa_key.pub
Adding SSH public key from /etc/ssh/ssh_host_ecdsa_key.pub
Adding SSH public key from /etc/ssh/ssh_host_ed25519_key.pub
[try 1]: Forwarding 'host_mod' to json server 'https://ipa1.tobehacker.com/ipa/session/json'
SSSD enabled
Configured /etc/openldap/ldap.conf
Configured /etc/ssh/ssh_config
Configured /etc/ssh/sshd_config
Configuring tobehacker.com as NIS domain.
Client configuration complete.
The ipa-client-install command was successful

==============================================================================
Setup complete

Next steps:
      1. You must make sure these network ports are open:
              TCP Ports:
                * 80, 443: HTTP/HTTPS
                * 389, 636: LDAP/LDAPS
                * 88, 464: kerberos
                * 53: bind
              UDP Ports:
                * 88, 464: kerberos
                * 53: bind

      2. You can now obtain a kerberos ticket using the command: 'kinit admin'
         This ticket will allow you to use the IPA tools (e.g., ipa user-add)
         and the web user interface.
      3. Kerberos requires time synchronization between clients
         and servers for correct operation. You should consider enabling ntpd.

Be sure to back up the CA certificates stored in /root/cacert.p12
These files are required to create replicas. The password for these
files is the Directory Manager password
查看版本
ipa --version

查看ipa相关的服务
ipactl status

访问ipa1 的Web UI
在电脑上设置自己的host , 我的访问地址是 : https://ipa1.tobehacker.com/ipa/ui

输入刚刚安装ipa1 设置的 admin 用户密码


配置高可用
前提条件,网络配置
添加一个Host

添加反向区域ip网络

删除 ipa2 A记录

重新添加 ipa2 的A记录,勾选反向解析:

同样删除ipa1 A记录

重新添加 ipa1 的A记录,勾选反向解析:

在ipa1主机 验证ipa2主机(也可以在ipa2主机上验证ipa1)
dig +short -x 192.168.18.152
ipa2.tobehacker.com.
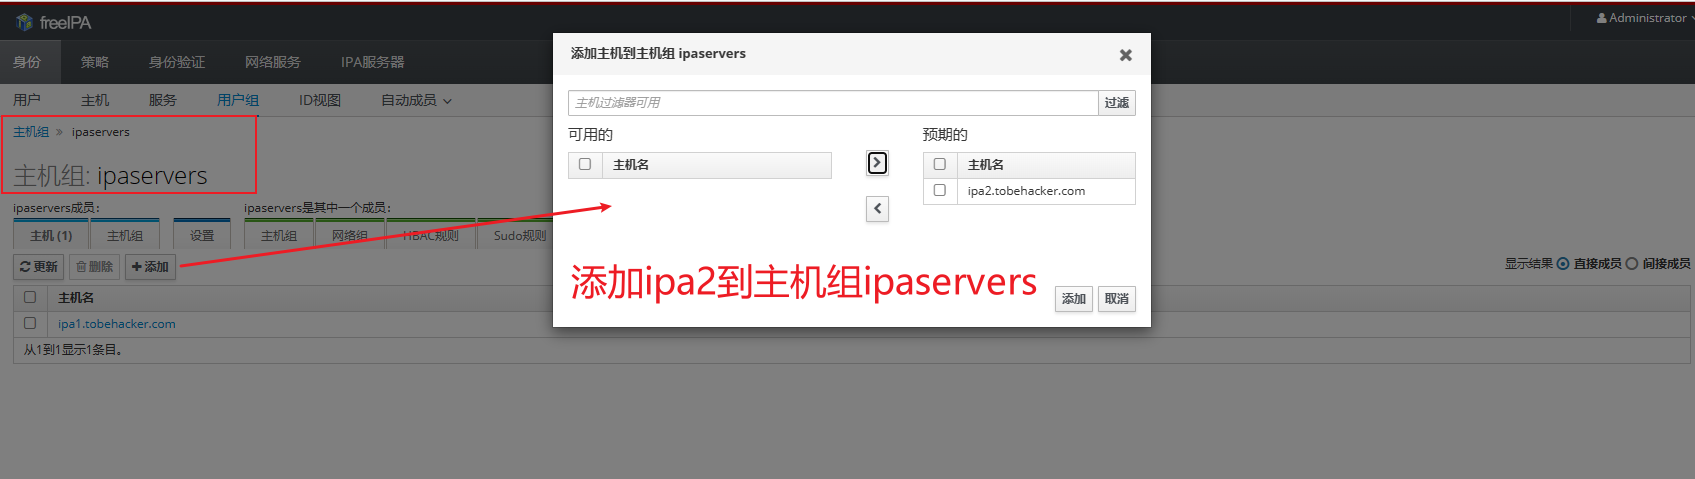
添加ipa2到 ipaservers 主机组
ipa2 安装客户端
yum -y install ipa-client
ipa-client-install --mkhomedir --enable-dns-updates --no-ntp -p admin

验证客户端功能
确保可以自动创建用户家目录
authconfig --enablemkhomedir --update
如果可以查到admin说明配置正常
id admin
查看所有用户
ldapsearch -x -b "dc=tobehacker,dc=com"
ipa2上安装副本,高可用
admin执行登录
kinit admin
高可用安装
ipa-replica-install --setup-ca --setup-dns --no-forwarders --no-ntp
查看 ipa1和ipa2 服务个数
ipactl status

查看FreeIPA复制服务
在两个主机上应该是一致的输出
ipa-replica-manage list

检查主从
ipa-replica-conncheck --master ipa1
参考资料
(1)ChatGpt
(2)官网快速指南-推荐
(3)官网新版本高可用指南-推荐
(4)Red Hat-推荐
(5)Oracle官网指南-推荐
(6)wsid博客 wsid博客
评论区